Symptom:
An issue sometimes seen while using the DgIpServ for Windows utility to update the firmware of an Etherlite, is that the Etherlite can sometimes appear to "hang" after the power-cycle portion of the firmware update wizard.
Cause:
Here are some potential causes of the symptom behavior mentioned above:
* Both the PC running DgIpServ and the Etherlite itself, must be on the same Network Subnet.
* DHCP servers can sometimes interfere with the update.
A workaround may be possible if you can limit the "network" to the PC and Etherlite itself, connected to a common hub (or back to back with a crossover cable). Keep in mind that without a DHCP server on this mini-network, you'll need to assign both PC and Etherlite a static IP address on the same Network Subnet (see #1 above).
* Having multiple Network Interface Cards (NICs) installed in the PC can also be a problem.
This problem occurs when the IP packets of the utility go out the wrong subnet/Network adapter, so the Etherlite isn't found on the network. To resolve, ensure that all network adapters (other than the one for the network subnet the Etherlite is found on) are disabled temporarily. Once the firmware update has completed successfully, the other Network Adapters can be re-enabled for normal operation.
Solution:
1. Ensure that you've downloaded/installed the latest version of
DgIpServ for Windows. The file found on the linked page will need to be unzipped first, at which point DgIpServ.exe can be run. A readme.txt file is found within the zip as well, which contains the latest release information regarding the utility. There is also a useful dgipserv.hlp Windows Help file within the zip.
Note: If you have a newer version of the Windows operating system, you may need to download Windows Help from the Microsoft website.
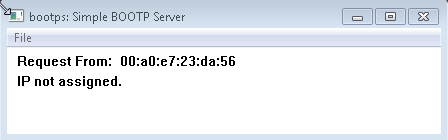
You should see your Etherlite's MAC address pop-up similar to the example above.
If the MAC address of your Etherlite doesn't appear, verify and resolve the three potential causes listed in the
Cause section above before continuing.
4. Close the bootps.exe window to
stop Bootp.
5. Run
DgIpServ for Windows.
6. Chose the
Update Firmware option, then select
Next.
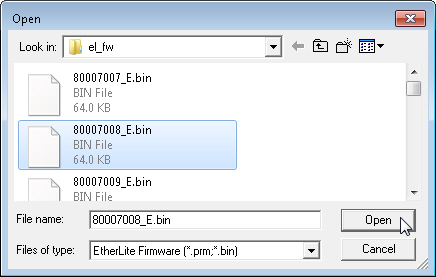
7. A "browse" window will open. Find and select the
firmware file you'll use to update your Etherlite (
firmware for the appropriate model can be downloaded here)
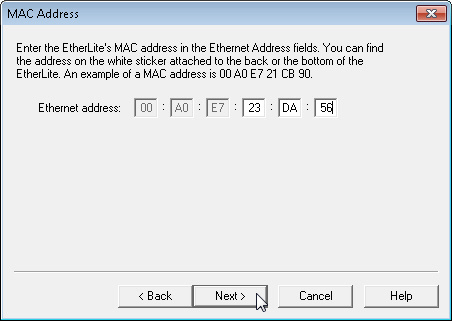
8. Enter the
MAC address of the Etherlite (printed on the chassis), then select
Next
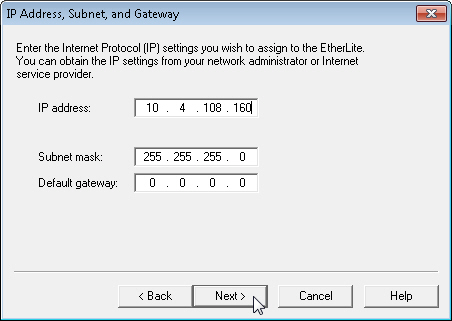
9. Enter the
IP address for the Etherlite, then select
Next.
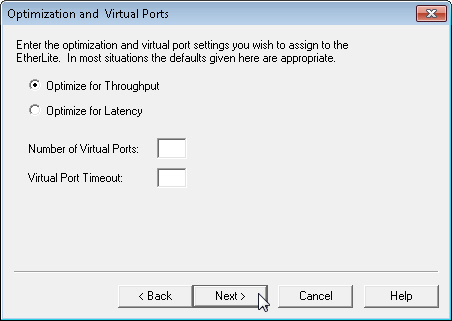
10. Select the
Optimization and
Virtual Ports options (leave at default if unknown), then select
Next.
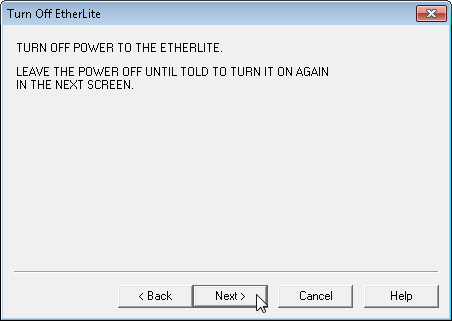
11.
Unplug the power of your Etherlite, then select
Next.
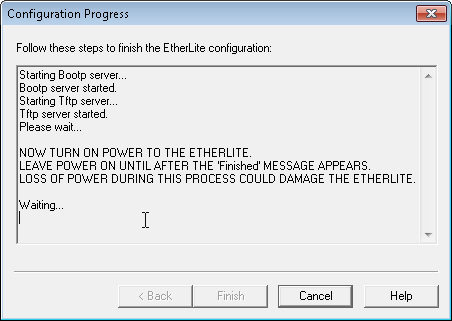
12. Wait until both
"Bootp server started." and "TFTP server started." status messages are seen like in the example below,
before powering the Etherlite
ON.
13. If the firmware update completes,
Finish will become accessible to complete the update. If the firmware update never completes, select
Cancel instead and verify steps 2 - 4 again before re-attempting the rest of the Firmware update procedure.
What to do if your update failed:
If the DgIpServ for Windows firmware update failed, you may need to go about updating the firmware another way.
See the following useful articles for further information:
Etherlite Boot Console
What happens during a DgIpServ session?
How to use the DgIpServ utility to assign an IP address to an EtherLite in Windows
What is the most reliable way to upgrade firmware on an Etherlite (or what can I do if all else fails)?
HOW TO: Upgrade the firmware of a remote Etherlite
Last updated:
Jun 05, 2019